Pages

October 22, 2010

Dining Room Shelf/Buffet


I've been looking for a buffet to go in our dining room for almost a year. The only problem is, our dining room isn't the biggest, and I realized that when we put the leaf in our table, a buffet would no longer fit. Bummer! On to Plan B. To be completely honest, the only reason I wanted a buffet was to be able to display some of the beautiful dishes we received as wedding gifts. It seemed a shame to have them tucked away in our kitchen. That's when I came up with this idea:


Now I have display space and still have room to pull out the table when we've got company. I love it! Our shelf is called "Lack" from Ikea. It was only $30. At first I was a bit nervous that we'd hear the crashing of dishes during the night and the shelf would pull out of the wall, but so far so good. I love the look of adding decorative wooden brackets and will feel more comfortable displaying heavier items once we find the right color stain for them.


All you you need for the project besides the shelf is a drill. Really, that's it. And maybe a handy husband :) I realize it's not yet Halloween, but I'm already excited to come up with a Christmas display for this spot. Happy decorating!

October 21, 2010

Not So Fun House Project

We have a sweet little puppy named Leo. Since he is mostly good, and because we try to be good puppy parents, we decided that Leo could go in our gated kitchen on the days that both my husband and I work. He did great the first two weeks. On Tuesday evening, this is what my husband came home to:


Can you believe that our sweet little boy could do something like this?


Fortunately, the old homeowners left us some extra flooring materials. So our current, un-planned for, un-fun house project is now a flooring patch job. Good thing Leo's cute.

October 17, 2010

Good Enough

While blog hopping this afternoon, I ran across this posting from a blog called The Inspired Room. It's such a good reminder of priorities and not to turn good things (even budget decorating!) into an idol and a time hog. Which I can have tendencies to do sometimes- ugg! Here's a teaser:
"How long could we be content with what we have right now? When I declare to myself that I am in a “good enough” season, it helps me to refocus my eyes off of ME and MY OWN WORLD. When I really enjoy something, like working on my home or even something like blogging, it is easy for it to become an obsession and a self-absorbed addiction. And that is just not a good thing for me. I need to find balance for my own health and well-being, as well as for that of my family. I need to step away sometimes. When I am in a 'good enough season,' I am freed up all the more to open my home to others and volunteer my time for other things. If I fill up my free time being outwardly focused, I have less free time to obsess over details of my own house. A 'good enough season' keeps me from falling into the trap of perfectionism and helps me remember that I already have all the blessings I need."
Read the whole thing though, it's helpful and refreshing. Check it out!


October 3, 2010

Pumpkin Topiary

Happy October! I've completed another pumpkin project: a pumpkin topiary! This one's cheap and easy, too.


Can you see Leo checking out the topiary? :) Here's what you need:
  • A couple of pumpkins in varying sizes. I found a big, medium, and small pumpkin. Look for ones that are "flat" on top, or have more of an oval shape as opposed to round. They'll stack and balance better.
  • Some type of outdoor urn (or basket or flower pot). Mine was hunter green, so I spray painted it gray. I think I'm going to respray it, as "dark gray" turned out to be shinier and lighter than I was going for (anyone think it resembles duck tape? :)
  • Leave garland
  • Serrated knife or small saw
After spraying the urn duck tape dark gray, I filled it with and old bed sheet (yes, an old bed sheet, I'll admit it) and wound the leaf garland around the inside of the urn. In my case, the opening of the urn was bigger than the bottom pumpkin, and I needed something to cover up the bed sheet. Plus, even if you don't need any coverage, I think the garland is cute and whimsical. Then I sawed off the stem and plunked in the first pumpkin. Depending on the size of your urn, you may or may not need anything to fill in the bottom in order to lift up the bottom pumpkin. An old sheet worked well because I could wad it up to fit the contours of the bottom pumpkin so I could rotate it to get the flattest part facing up. This helped the other pumpkins balance well on top.


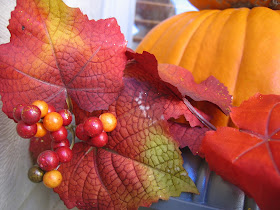
Here's a close up of the garland. Aren't the berries cute? FYI: As well a mild pumpkin fixation, I'm also finding I'm drawn to berries.


After getting the bottom pumpkin situated, saw off the second pumpkin's stem and add it to the topiary. Top it off with the smallest pumpkin and you're done!


Here's few other pumpkin topiary pictures that I used for inspiration:


I love the idea of carving the pumpkins (especially like in the second picture!) but wanted mine to last for a while. Once cut, the pumpkins seem to shrivel up and die within a week or so.